
Full Beginner Guide: How to Build a RISC-V CPU on an FPGA (2026 Edition)
Building a RISC-V CPU on an FPGA is one of the most rewarding projects in hardware design. It teaches digital logic, Verilog/SystemVerilog, computer architecture, and the RISC-V instruction set — and you end up with a real, programmable processor you can run code on.
This guide is practical and beginner-friendly. You can have a basic working CPU in a weekend or two.
1. Prerequisites
Before starting, you should have:
- Basic understanding of digital logic (gates, flip-flops, multiplexers, state machines).
- Beginner-level Verilog (modules, always blocks, simulation).
- Some programming experience (C or assembly will help later).
Quick prep resources:
- Nandland’s free Verilog tutorial
- “Digital Design and Computer Architecture” by Harris & Harris (RISC-V edition) – read chapters 1–7
Tip: If you’re completely new to FPGAs, spend 1–2 days on a simple LED blinker project first.
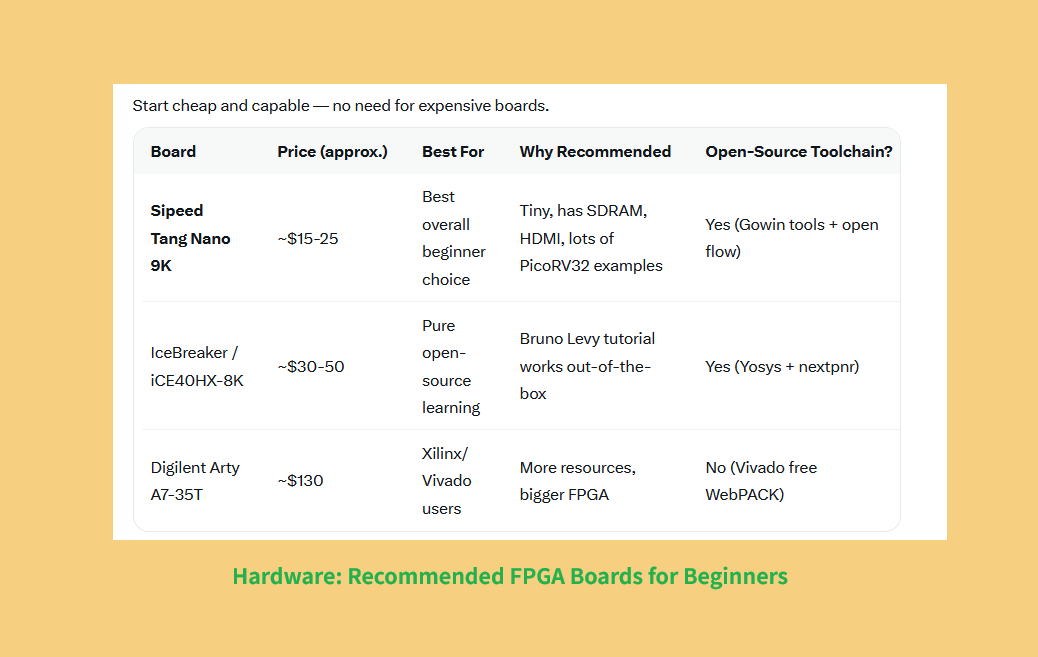
2. Recommended Hardware – FPGA Boards for Beginners
Start with affordable and well-supported boards:
| Board | Approx. Price | Best For | Why Recommended |
|---|---|---|---|
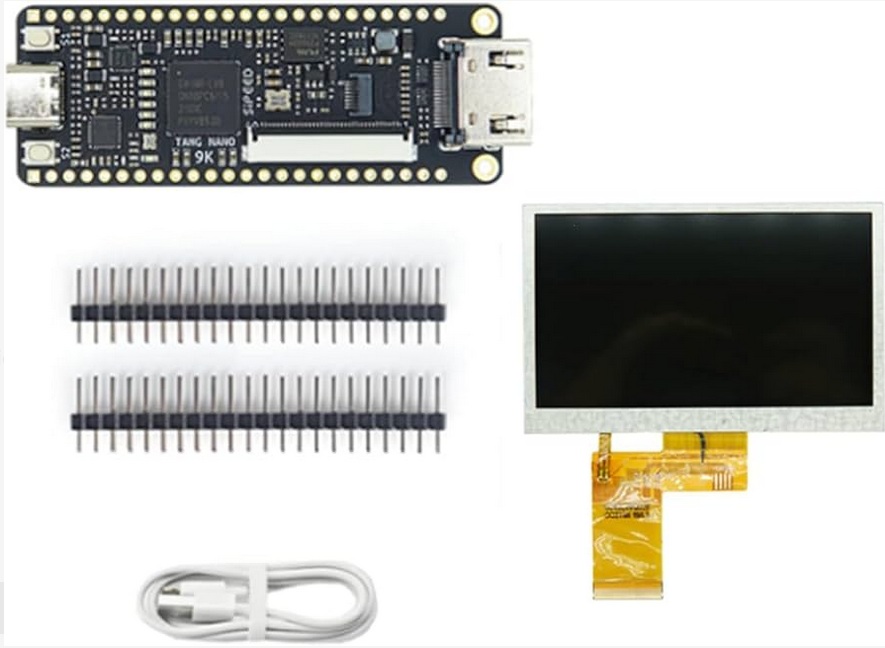
| Sipeed Tang Nano 9K | $15–25 | Best overall beginner choice | Cheap, has SDRAM, HDMI, excellent community examples |
| IceBreaker / iCE40HX-8K | $30–50 | Pure open-source learning | Works perfectly with Bruno Levy’s tutorial |
| Digilent Arty A7-35T | $130 | Xilinx/Vivado users | More resources and larger FPGA |
Top recommendation: Tang Nano 9K — best balance of price, features, and support in 2026.
3. Tools & Software Setup
You have two main paths:
Path A – Fully Open-Source (Recommended for Learning)
- Yosys + nextpnr + iverilog (for simulation)
- Works great on Linux/Mac (use WSL on Windows)
- Best tutorial: Bruno Levy’s learn-fpga
Path B – Vendor Tools
- Gowin IDE (free) for Tang Nano 9K
- Xilinx Vivado WebPACK (free) for Arty boards
You’ll also need a RISC-V toolchain:
riscv32-unknown-elf-gcc( Install Via
apt install gcc-riscv64-unknown-elf or similar)4. Two Ways to Build Your RISC-V CPU
Option 1: Build from Scratch – “From Blinker to RISC-V” (Best for Deep Learning)
This is the #1 recommended tutorial:
- GitHub: https://github.com/BrunoLevy/learn-fpga
- It literally starts with a blinking LED and turns it into a full RV32I RISC-V CPU step-by-step (24 small steps total).
- You modify one thing at a time, simulate, and test on hardware.
- By step 7 you already have a working CPU executing real code.
- Later steps add UART, graphics, Mandelbrot, etc.
Timeline: 1–3 weeks part-time.
Why it’s perfect:
- Extremely gentle progression.
- Uses pure Verilog + open tools.
- You understand every single line.
Option 2: Drop in a Ready Core + Modify It (Fastest to Working System)
Use PicoRV32 — the most popular tiny RISC-V core (by Claire Wolf / YosysHQ).
- GitHub: https://github.com/YosysHQ/picorv32
- Extremely small (~750-2000 LUTs).
- Supports RV32I / IM / C / E.
- Tons of ready SoC examples for Tang Nano 9K.
Quick start for Tang Nano 9K:
- Clone a ready project (e.g. grughuhler/picorv32_tang_nano_unified).
- Synthesize → program the board.
- Compile C code with riscv-gcc and load it via UART.
This gets you a working RISC-V system in <1 hour, then you can start modifying the core.Pro tip: Start with PicoRV32 to get excited, then go back and build your own with Bruno’s tutorial.
5. High-Level Architecture of a Basic Single-Cycle RISC-V CPU
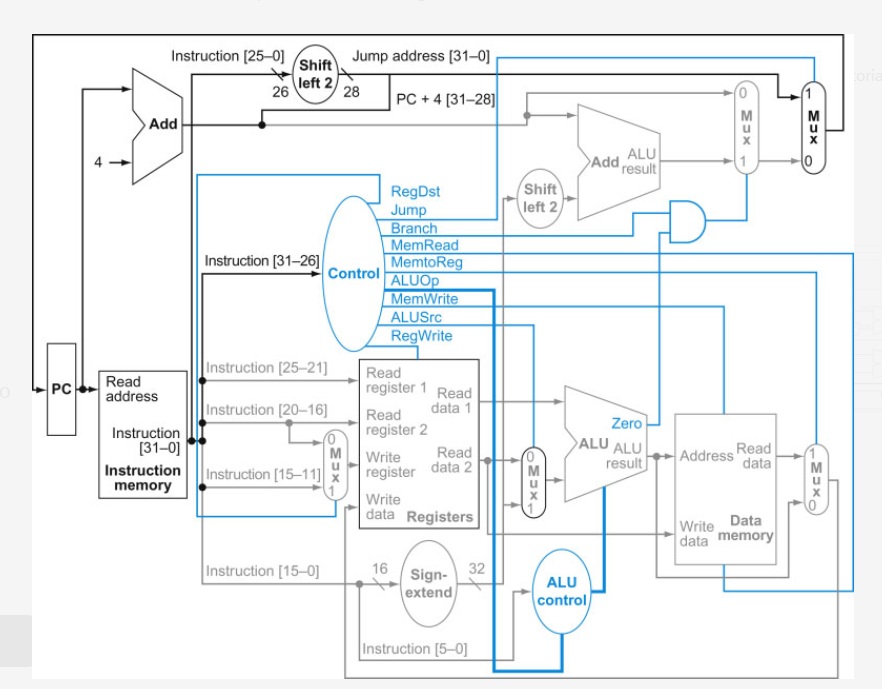
A minimal RV32I single-cycle CPU includes these main blocks: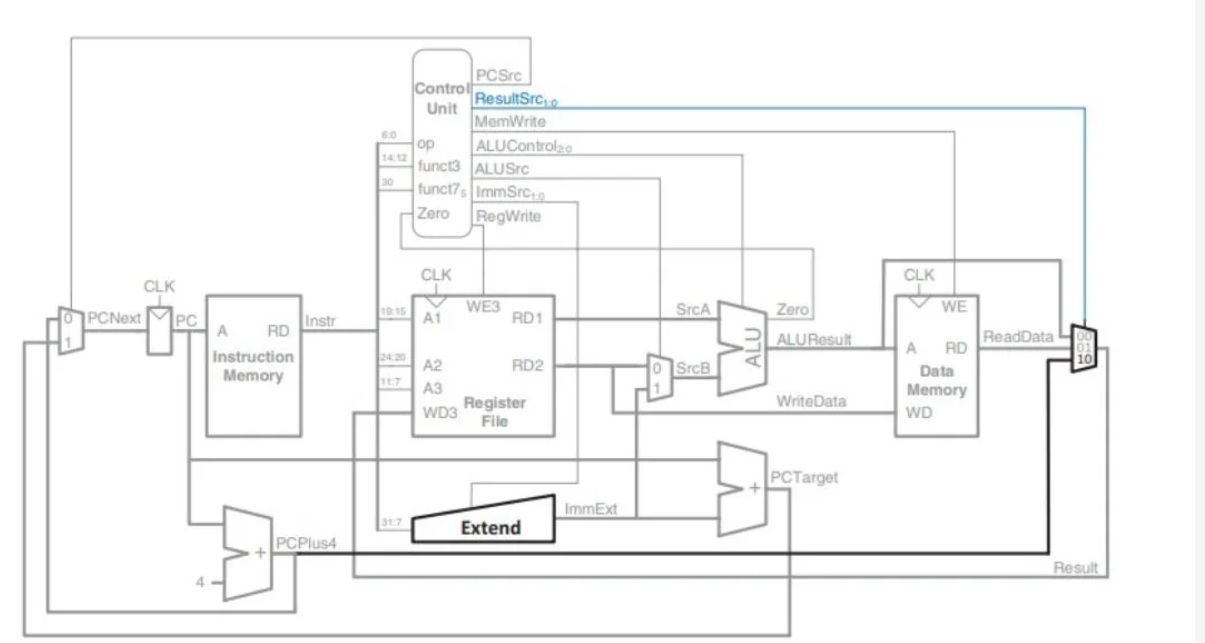
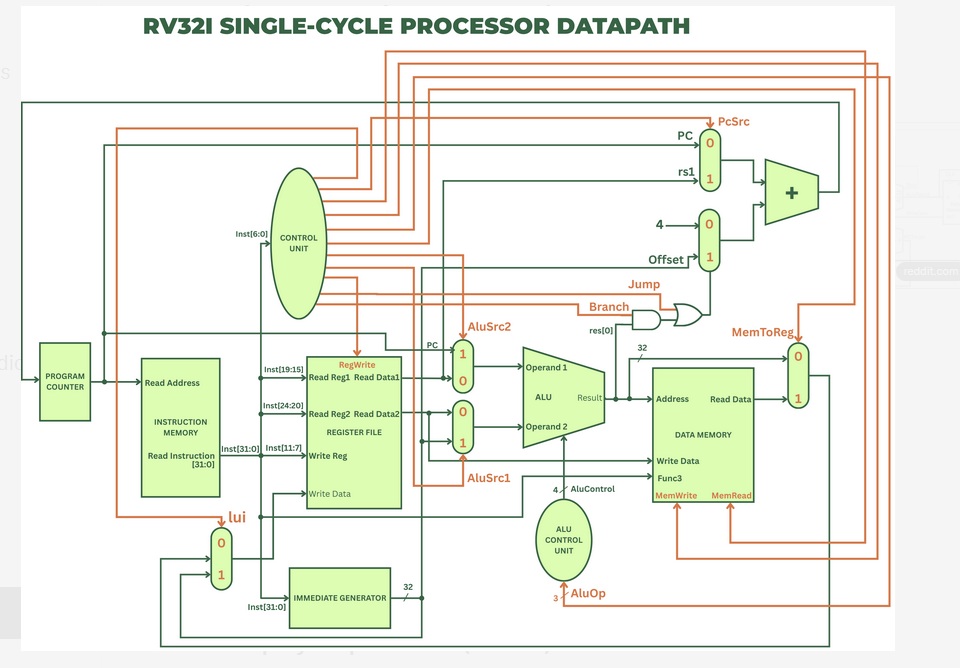
- Program Counter (PC)
- Instruction Memory
- Register File (32 × 32-bit registers)
- ALU (Arithmetic Logic Unit)
- Data Memory
- Immediate Generator
- Control Unit (decodes instructions)
You implement these as Verilog modules, connect them, simulate heavily, then synthesize for the FPGA.
6. Step-by-Step Workflow (General)
- Design/spec the ISA subset (start with RV32I base integer instructions).
- Write Verilog modules (ALU first — it’s the easiest).
- Simulate with testbenches (Icarus Verilog or Vivado simulator).
- Integrate into a top-level SoC (add memory + UART for output).
- Synthesize → generate bitstream.
- Program the FPGA.
- Write/test assembly or C programs (blink LED → printf → run real apps).
- (Advanced) Add pipeline, branch prediction, interrupts, FPU, etc.
Simulation is critical — do 90% of your debugging here before loading onto hardware.
7. What to Do After Your First CPU Works
- Add a 5-stage pipeline.
- Implement peripherals (UART, SPI, VGA/HDMI).
- Run more complex programs (raytracer, simple games).
- Explore advanced cores like NEORV32.
- Learn formal verification.
Bonus Resources
- RISC-V ISA Specification (Volume I) – read the RV32I chapter.
- Project F FPGA tutorials (excellent visuals).
- YouTube: Search for “Building a RISC-V CPU” (2024–2026 videos).